Introduction into EAP-TLS
EAP-TLS is widely recognized as one of the most secure methods for network authentication. This blog provides a step-by-step guide to setting up FreeRADIUS to support EAP-TLS. We will cover configuring FreeRADIUS. Additionally, we will go over setting up the required certificate template in your Certification Authority (CA). We will also configure profiles in Microsoft Intune to streamline certificate deployment and device authentication. This guide assumes that both the Certification Authority (CA) and Network Device Enrollment Service (NDES) are already configured. If they aren’t, please refer to Configure infrastructure to support SCEP certificate profiles with Microsoft Intune | Microsoft Learn. You can also check out Install the Certification Authority | Microsoft Learn for detailed setup instructions. I also found the instruction video from S03E14 – Configuring NDES for SCEP Certificate Deployment (I.T) very helpfull. Make sure to follow the steps precisely or else you will run into issues later on.
The configuration of the required freeRADIUS server is actually quite simple. It only consists of the following high level tasks:
- Get a certificate (clients will validate the server certificate during EAP-TLS)
- Configure EAP(-TLS) freeRADIUS module
- Add my access points as radius clients
Lets get started!
STEP 1: INSTALL FREERADIUS
I installed FreeRADIUS on a Linux Debian server using packages described in this documentation https://packages.inkbridgenetworks.com/ . Make sure to choose the right Operating system and OS Version that matches your server.
Step 2: Configure Certificate Templates on the CA
- Access the Certificate Authority: Log in to the CA server and navigate to Server Manager → Tools → Certification Authority.
- Duplicate a Web Server Template:
- Right-click on Certificate Templates and select Manage.
- Locate the Web Server template, right-click it, and choose Duplicate Template.
- Configure the New Template:
- General Tab: Set a meaningful name for the certificate.
- Compatibility Tab: Set both options to Windows Server 2016.
- Issuance Requirements Tab: Check Require Certificate Manager Approval.
- Subject Name Tab: Select Supply in the request.
- Extensions Tab: Add the following Application Policies:
- Client Authentication
- Server Authentication
- Cryptography Tab:
- Provider Category: Key Storage Provider
- Set Request must use one of the following providers to Microsoft Software Key Storage Provider.
- Hash Algorithm: SHA256.
- Issue the Template:
- Save and issue the new template in the Certificate Templates section.
- Ensure the computer account has Read and Enroll permissions; otherwise, the template will not be visible when requested.
- Very important to remember the application policies. Those are the policies that we will be defined in our SCEP profile.
Step 3: Create a certificate Signing Request (CSR) on the Radius server and submit csr into internal CA
(This process generates a trusted RADIUS server certificate by creating a CSR, submitting it to the internal CA, and issuing a secure, policy-compliant cert for authentication and encryption)
- Generate a Certificate Signing Request (CSR). Log in to the RADIUS server. Then, run: openssl req -new -sha256 -newkey rsa:2048 -nodes -keyout /etc/freeradius/certs/server.pem -days 365 -out /etc/freeradius/certs/request.csr
- During the CSR prompts, use the Fully Qualified Domain Name (FQDN) of the RADIUS server for the Common Name (CN).
- Transfer the CSR to the CA: Use WinSCP or an equivalent tool to securely transfer the CSR to the CA.
- Submit the CSR: On the CA, submit the CSR and specify the previously (STEP 2) created template:
certreq -attrib "CertificateTemplate:YourTemplateName" -submit "C:temprequest.csr"- Copy the request ID provided after submission.
- Use the path where the CSR is saved (e.g.,
C:temprequest.csr). - Replace YourTemplateName with the name of your previous created template name
- Approve and Export the Certificate:
- Approve the pending certificate request.
- Retrieve the certificate using the request ID: certreq -retrieve “Request ID”
- Export the issued certificate in Base64 format along with the root CA certificate.
- Save this issued certificate as server.crt and the root ca as ca.pem.
- Transfer these files back to the RADIUS server using WinSCP and place them in /etc/freeradius/certs.
- Combine Certificate and Key: On the RADIUS server, combine the key and issued certificate into a
.pemfile:cat /etc/freeradius/certs/server.pem /etc/freeradius/certs/server.crt > /etc/freeradius/certs/server.pem - Set ownership: transfer ownership to freeradius:
chown freerad:freerad /etc/freeradius/certs/* chmod 600 /etc/freeradius/certs/* - Edit
eap.conf: Open the EAP configuration file:sudo nano /etc/freeradius/mods-enabled/eap - Update the default EAP type and TLS configuration:

Step 4: Adding RADIUS Clients
Your access points (APs) or network devices need to communicate with the RADIUS server. To achieve this, define them as RADIUS clients in the clients.conf file.
- Open the
clients.confFile: Run the following command to open the file for editing:sudo nano /etc/freeradius/clients.conf - Add Your RADIUS Clients: Using a subnet and mask, define your APs or network devices. Here’s how my config looks:
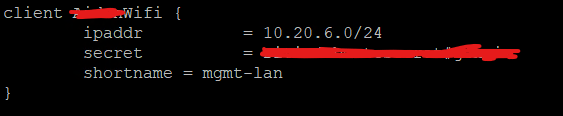
- ipaddr: Specifies the subnet or IP range of your devices.
- secret: Shared secret used for authentication between the client and the RADIUS server.
- shortname: A friendly name for the client, used for logs.
Step 5: Debugging and Validation
- Restart FreeRADIUS: Restart the service to apply changes:
sudo systemctl restart freeradius - Run Debug Mode: Start FreeRADIUS in debug mode to identify configuration issues:
sudo freeradius -X - Verify Service Status: Check the service status:
sudo systemctl status freeradius - The service should display active and running
Step 6: Configuring the Wireless Network Profile
To integrate the FreeRADIUS server with your wireless network, you need to configure the RADIUS profile on your access points (APs) or wireless network controller. Below are the steps for setting up a RADIUS profile in your network settings:
- Access the Network Configuration: Log in to your wireless network controller or AP management interface and navigate to the Profiles or RADIUS Settings section.
- Create a New RADIUS Profile: Name the profile something meaningful.
- RADIUS Authentication Server: Add the details for the FreeRADIUS server under the Authentication Servers section:
- IP Address: Enter the IP address of your FreeRADIUS server
- Port: Use the standard RADIUS authentication port
1812. - Shared Secret: Use the same shared secret you defined in the
clients.conffile.
- Enable Accounting (Optional): If you want to enable RADIUS accounting to track usage or monitor activity:
- Add the RADIUS server details under Accounting Servers:
- IP Address: Enter the same IP as your FreeRADIUS server.
- Port: Use the RADIUS accounting port
1813. - Shared Secret: Use the shared secret configured in
clients.conf.
- Enable Interim Updates to send usage data periodically:
- Update Interval: Set to
3600seconds (1 hour) or your preferred interval.
- Update Interval: Set to
- Add the RADIUS server details under Accounting Servers:
- Save and Apply Changes: Save the RADIUS profile and apply it to the wireless network or SSID.
- Assign the Profile to Networks: Associate the
Radiusprofile with the appropriate wired or wireless networks as needed.
Step 7: Distribute Certificates and Configure Wi-Fi Profiles in Intune
To streamline certificate distribution and automate network configuration for client devices, use Microsoft Intune. This step ensures that SCEP, root CA certificates, and RADIUS server certificates are delivered securely to client devices, and that Wi-Fi profiles are pre-configured.
1. Distribute Certificates via Intune
- Add Root CA Certificate:
- Navigate to the Intune Admin Center.
- Go to Devices → Configuration profiles → Create Profile.
- Select Windows 10 and later and choose the Trusted Certificate profile type.
- Upload your Root CA Certificate
- Destination store: Computer certificate store – Root
- Assign it to a device or user group or both.
- Add RADIUS Certificate:
- Follow the same process to create another Trusted Certificate profile.
- Upload the RADIUS server certificate and assign it to the same groups.
- Destination store: Computer certificate store – Intermediate
- SCEP Configuration:
- Navigate to Devices → Configuration profiles → Create Profile.
- Select Windows 10 and later and choose SCEP Certificate.
- Certificate type: Device
- Certificate validity period: Not longer than the validity set in your sceptemplate
- Choose the appropiate Subject name format for your situation.
- Key storage provider (KSP): Enroll to TPM KSP if present, otherwise Software KSP
- Key usage: Select both or define as set in your template
- Key size: 2048 (as set in your template)
- Hash algorithm: SHA-2 (as set in your template)
- Root Certificate: (Select the previous create Root profile)
- Extended key usage: Must match the application policies set in the template created in Step2
- SCEP Server URLs: Created during creation NDES. With me it is an app proxy i created in Entra that redirects external requests securely to the internal NDES service.
- Make sure to assign this to the same groups used in the Root profile.

2. Create a Wi-Fi Profile
- Navigate to Wi-Fi Profiles:
- In the Intune Admin Center, go to Devices → Configuration profiles → Create Profile.
- Choose Windows 10 and later and select the Wi-Fi profile type.
- Configure Wi-Fi Settings:
- Wi-Fi type: Enterprise
- Wi-Fi name (SSID): Your SSID
- Connection name: Can be the same as the SSID
- Authentication mode: Machine
- EAP type: EAP-TLS
- Certificate server names: Common name used by certicates that are issued by your CA
- Root certificates for server validation: Choose your root profile for server validation or both root profiles. Does not matter very much
- Authentication methode: SCEP certificate
- Client certificate for client authentication (Identity certificate): Choose your scep profile
- Assign the profile to the appropriate groups in Intune.

Verification:
- Confirm that devices receive the certificates by checking the Certificate Manager on the client device.
- Verify that the Wi-Fi profile is applied. Ensure the device can automatically connect to the network using the distributed certificates.
By completing this step, your network will be fully integrated with Intune for automated certificate distribution. This will also set up Wi-Fi configuration. This ensures a seamless experience for users while maintaining security.

Plaats een reactie